Difference between revisions of "Vorpal The Hexapod Easy Wiring Guide"
Vorpalwiki (talk | contribs) (→Robot Servo Driver Connections) |
Vorpalwiki (talk | contribs) (→Robot Servo Driver Connections) |
||
| Line 25: | Line 25: | ||
File:SD15.JPG|The connector labelled SD 15 goes in port 15 of the Servo Driver. Notice that black/brown wires always go to the outside pin. | File:SD15.JPG|The connector labelled SD 15 goes in port 15 of the Servo Driver. Notice that black/brown wires always go to the outside pin. | ||
File:SD12-to-SD15.JPG|This view shows all of the SD connectors installed near the bottom of the picture (SD 12, SD 13, SD 14, SD 15) | File:SD12-to-SD15.JPG|This view shows all of the SD connectors installed near the bottom of the picture (SD 12, SD 13, SD 14, SD 15) | ||
| + | </gallery> | ||
| + | |||
| + | ==HC05 Bluetooth Module Connection== | ||
| + | <gallery mode=packed> | ||
| + | File:HC05-VCC-RX.JPG|Notice that there is one pin not used on the left and the right. Just use the four middle pins. | ||
</gallery> | </gallery> | ||
Revision as of 13:59, 22 October 2019
Contents
Introduction
In November, 2019 we're introducing a new pre-built electrical system option for [Vorpal the Hexapod]. This is expected to cut build time by approximately half, and also should almost eliminate wiring errors. This article describes how to hook up the robot and gamepad wiring harnesses to components like the Nano, HC05 Bluetooth modules, etc.
General Information
In the previous system, connections had to be made one wire at a time between components such as the Nano and Servo Driver. For younger students this was error prone. In the new system, there are several large connector receptacles which form a _wire harness_. For example, the Nano that goes in the hexapod has only two fifteen-pin connectors to plug in (instead of a dozen individual wires).
Each of these large receptacles has a label. The label tells you which component to install that connector on, and where.
Robot Nano Connections
The robot Nano (the Nano labelled "R") requires two connectors.
Let's take them one at a time. One of these is labelled: "R Nano" then under that: "D13 ... VIN".
The label "D13 ... VIN" means that the leftmost pin of the connector should be inserted into the D13 pin of the Nano, and the right side of the connector should be inserted into the VIN pin of the Nano. In other words, the label is showing you the first and last pin labels on the Nano that correspond with the sockets in the connector. The following pictures show exactly how things should look on both sides of the Robot Nano.
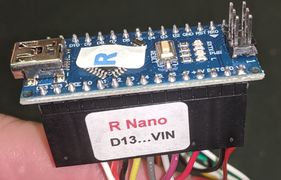
Notice that the USB port is facing left.
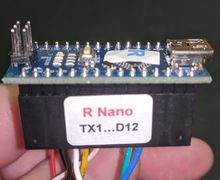
Notice that the USB port is facing right.


When you insert a side of the Nano into its connector, be certain that all the pins on the Nano are aligned in corresponding holes in the connector. Then apply pressure. Sometimes it takes a little force, sometimes it's useful to press one side down first then the other, in a wiggling motion until the connector is fully seated.
Robot Servo Driver Connections
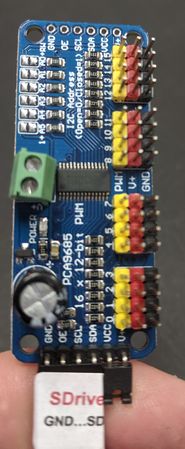
The connector's "SDA" label will be right next to the black shunt
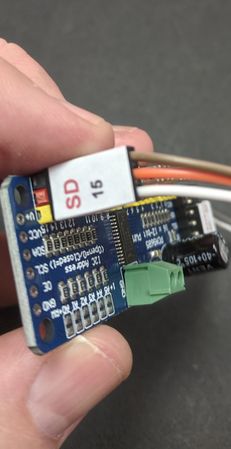
The connector labelled SD 15 goes in port 15 of the Servo Driver. Notice that black/brown wires always go to the outside pin.
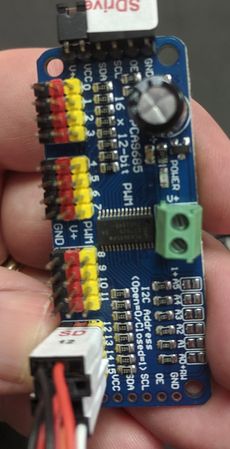
This view shows all of the SD connectors installed near the bottom of the picture (SD 12, SD 13, SD 14, SD 15)


HC05 Bluetooth Module Connection
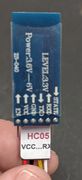
Notice that there is one pin not used on the left and the right. Just use the four middle pins.
