Vorpal The Hexapod Battery/Switch Construction
|
Vorpal Hexapod Quick Links:
|
Note: If you purchase kit parts from Vorpal Robotics, you will receive the battery/switch assemblies for both the hexapod and gamepad pre-assembled with no soldering required. These instructions are for people who wish to source their own parts. These instructions assume you are familiar with soldering, stripping wires, and other basic electrical tasks.
Contents
Vorpal Store
If you want to source most of your own parts but can't find an item or two, we have every part individually available at the Vorpal Robotics Store.
If you source your own parts and feel the project has been worthwhile, we would respectfully ask you to make a $3 donation at our store. This will help us continue to develop great new projects. Go here to make a donation: Vorpal Store Donation
A Note On Support for Self-Sourcers
We are happy for Makers to source their own parts, however please do not ask us for a ton of hands-on support to help get your project to work if you're doing that! If you want to self-source parts, you need to be familiar with things like soldering, electronics terminology, configuring Bluetooth modules, etc. If you don't have those skills, our kits are a much better way to go; or try some easier projects first to learn those basic Maker skills before tackling this one.
Our first priority for support has to be our paying customers, that's what allows us to continue working on new great open source projects. We're glad to help on a time-available basis, and it's perfectly fine for you to post questions to our Vorpal Robotics Forum to ask the Vorpal community for help.
Gamepad Battery/Switch Assembly
You will need:
- A standard 9v battery clip with RED/BLACK color coded lead wires.
- A rocker switch, single throw single pole. The hole for the switch in the 3D models is 10mm x 14mm to accommodate a switch with hole profile 9mm x 13mm. If you can't get that exact size you either have to keep the switch inside the robot and remove the cap to use it, or you would need to modify the 3D models.
- Two single pin Dupont female connectors, preferably one RED and one BLACK wire so you can color code the power properly.
- Some shrink tube or electrical tape to insulate connections.
- Tools and supplies: wire stripper, soldering iron, solder, heat gun or other means to shrink the shrink tube.
The diagram below shows how connections are made. As usual, RED colored wires will be connected to positive voltage, while BLACK wires are for ground.
Wire lengths are not to scale. You need the wires with the Dupont connectors to be at least 4 inches (100mm) long, and you need about the same from the switch to the 9v battery clip.
Hexapod Battery/Switch Assembly
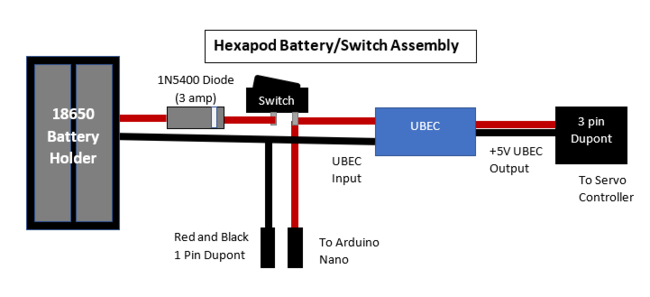
This circuit is slightly more complicated. We are feeding the raw battery power directly to the Arduino Nano's VIN and GND pins, and allowing it to do its own power conversion. The Nano also supplies regulated power to both the Bluetooth module and Potentiometer, and also to the optional CMUCAM5 through the ICSP header. The servos and buzzer are powered through a UBEC which provides regulated 5V power to the servo controller. The servo controller is used to distribute power to all the servos, but also to some peripherals like the buzzer and optional sensors (using its unused ports 12 through 15). The reason for this setup is that if all the servos are drawing power at once it may cause the UBEC output to sag lower than 5v momentarily from time to time. If the UBEC was providing regulated power directly to the Nano or the Bluetooth module, they would constantly be browning out during voltage sags. By giving the Nano and Bluetooth module a direct line to the raw battery, you get a far more reliable system. The servos can run fine at 4.8 volts or even slightly lower, but not the Nano. This circuit allows the Nano to continue operating during brief output sags. As long as the battery remains over about 5.5 volts you'll keep operating and won't lose your Bluetooth connection.
You will need:
- A 2 cell battery holder for 18650 LI-ON batteries. Other battery configurations are possible using alternative battery holders, see our technical guide Vorpal The Hexapod Battery Recommendations.
- A rocker switch, single throw single pole. The hole for the switch in the 3D models is 10mm x 14mm to accommodate a switch with hole profile 9mm x 13mm. If you can't get something that size you either have to keep the switch inside the robot and remove the cap to use it, or you would need to modify the 3D models.
- Two single pin Dupont female connectors, preferably one RED and one BLACK wire so you can color code the power properly.
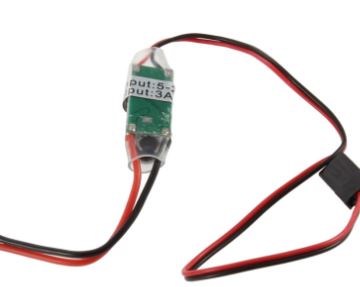
- A UBEC (BEC) to provide 5V regulated power at 3A.
- IMPORTANT NOTE: Makers who sourced their own parts have reported that the following UBECs do not work for this project. Although they claim to be able to output 3A or higher, apparently they shut down during brief surges:
- FPV Bluesky BEC
- 5V/4A RC Model Airplane Helicopter Speed Control 4A UBEC Brushless ESC IB (sourced on Ebay)
- You will know that your BEC can't output enough amps with the following test: Place the robot in DEMO mode. About 15 seconds in, it stops working and may start twitching, sagging to the ground, or curling up as if it's a dying insect! This behavior is highly correlated with a BEC that is not up to the task.
- IMPORTANT NOTE: Makers who sourced their own parts have reported that the following UBECs do not work for this project. Although they claim to be able to output 3A or higher, apparently they shut down during brief surges:
- Some shrink tube or electrical tape to insulate connections.
- One 1N5400 3 amp diode. (This is optional, but will save your electrical system if someone inserts the batteries backwards.)
- Tools and supplies: wire stripper, soldering iron, solder, heat gun or other means to shrink the shrink tube.
The diagram below shows how connections are made. As usual, RED colored wires will be connected to positive voltage, while BLACK wires are for ground.
Be very sure that you know which side of the UBEC is input from the battery, and which side is 5V regulated output. The UBEC we use has a 3 pin Dupont connector on the output side, although only 2 pins are populated (+5V, RED wire, and Ground, BLACK wire).
Wires are not shown to scale. You need at least 5 inches (125mm) of wire from the switch to the end of the three pin Dupont Connector coming off the UBEC. The battery holder needs to also have roughly 5 inches (125mm) of wire between it and the switch so you have enough room to bring the cable up and connect to the battery.
As stated previously, you may leave the diode out if you want, however then you would not have any reverse battery protection. If someone inserts both batteries backwards without the diode, then your electrical system will fry in about 1 second after power on. (The Nano will be destroyed, and possibly the HC05 and BEC as well).
Be sure you are inserting the diode the right way. The stripe should be on the switch side of the wire, not the battery holder side, as shown in the diagram.
Potentiometer Wiring
You will need:
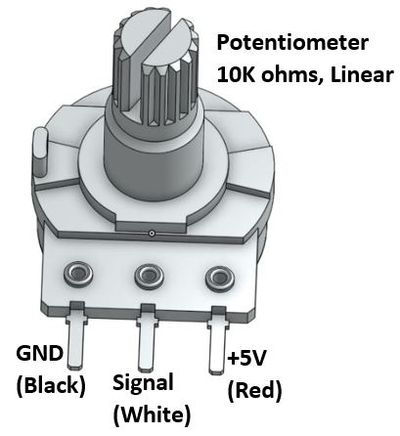
- A 10k ohm, linear rotary potentiometer with 6mm shaft.
- Three jumper wires, 150mm long, with a female Dupont connector on one end.
- Suggested colors are: 1 red, 1 black, 1 white (or any other color besides red or black for signal).
- You can purchase two-end jumpers and just cut off one end.
- You could also use a servo extension wire with the male end cut off.
- Some shrink tube or electrical tape to insulate connections.
- Tools and supplies: wire stripper, soldering iron, solder, heat gun or other means to shrink the shrink tube.
See the diagram at the right. Solder the wires in the order shown, and use either tape or shrink tube to insulate the solder joints.
A Note on HC05 Connections
The kits we sell use HC05 modules that are 5v tolerant. The model number on the module included in our kits is E475833. The manufacturer's own documentation shows this module being used directly with a 5V Uno digital IO pin. For this reason, we do not require a voltage divider when hooking the Rx pin of the HC05 to an Arduino Nano digital IO pin.
However, if you are using modules that are not 5v tolerant, you will need a voltage divider. There are tutorials all over the internet describing how to do this, and if you are sourcing your own parts you may need to use that information to protect the modules you use.
Vorpal The Hexapod Quick Links
| Sign Up For Our NEWSLETTER | VORPAL FORUM: Join the Discussion | |||
|
User Documentation: |
Getting & Giving Vorpal |
Activities: |
Contact/Press: |
|


