Vorpal The Hexapod Gamepad User Guide, V2
|
Vorpal Hexapod Quick Links:
|
Contents
Introduction
This article is the user guide for the Vorpal Gamepad. For instructions on the robot, see Vorpal The Hexapod User Guide.
The Vorpal Hexapod Gamepad has many features to let you control your hexapod, including:
- A range of 10 to 15 meters (30 to 50 feet) if batteries are fully charged.
Select one of twelve different pre-programmed movement modes, which then modify the functions on the yellow D-PAD buttons.
- Record and later play back a sequence of hexapod motions.
- Tether the gamepad to a computer using a USB cord, then use the MIT Scratch system to control the hexapod using a program you write.
- Upload Scratch-programmed leg motions onto the gamepad, then use them as new movement modes of your own design by long-clicking on mode buttons.
- Adjust the servo motor positions using Trim Mode
Although it seems like a lot to take in, everything is organized in major groups of functions and we have found that even small children can be successfully controlling the hexapod in under a minute, with very little explanation. After practicing for just a short time, you will be flipping through different modes and controlling the hexapod like a pro!
This article will explain all of these functions one by one and step by step, but for most functions it's also perfectly reasonable to just pick up the controller and experiment to learn what each button does!
General Care of the Gamepad
- Never allow the gamepad to get wet or be exposed to excessive dust or other environmental hazards.
- Do not drop or throw the gamepad, it contains sensitive electronics.
- Always remove the batteries after use. Leaving the battery in the gamepad risks that the gamepad is accidentally turned on and left to drain the batteries to the point where they are damaged.
- Make sure you're using fresh batteries at the start of each session. Running the gamepad on very weak batteries might cause the internal settings to be lost (which can be recovered by simply rebooting with fresh batteries while holding down the D-PAD "special" key).
Gamepad Button Layout and Terminology
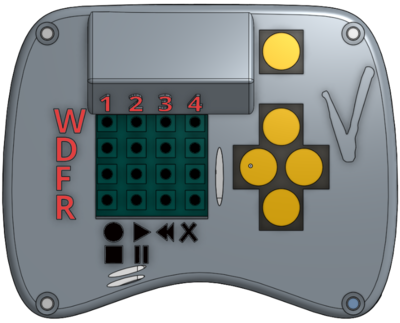
As you can see in the diagram, there are two groups of buttons on the gamepad:
- On the left are four rows of four buttons, and we'll call this group of buttons "the mode buttons".
- These buttons are used to select a movement mode or activate the record/play feature.
- The rows are labelled "W", "D", "F", and "R", and the columns are number 1, 2, 3, 4.
- In this guide, we'll refer to a button such as W1, meaning the button located in row W column 1, or D4, meaning row D column 4, etc.
- Below the mode buttons are symbols used to remind you of record/play functions. These will be described in more detail later in the section Record/Play.
- On the right are five yellow buttons. This is called the D-PAD (directional button pad).
- There are four buttons arrange in a diamond shape, and they correspond to directions (top of diamond is forward, bottom backward, left and right as you would expect). When we say "forward" we mean the top button, "backward" the bottom button, etc.
- The yellow button all the way at the top by itself activates special functions and will be called "special".
For example, in this guide might be a description such as "First press mode button W3, then forward." That means you first press button W3 for a moment, then after that press the yellow button at the top of the diamond, which is "forward".
Everything works consistently, in general all you do is:
- Select a movement mode by using the mode buttons on the left
- Then use the D-PAD buttons to move in different ways.
As a simple example, to access a normal walking mode, just press W1. After that, the D-PAD buttons will move the hexapod left, right, forward, or backward. The special button will cause the hexapod to "stomp" in place without moving. It's that simple.
Each row of mode buttons groups together similar functions. These will be explained in the next section.
The General Idea
The idea here is that you "click and release" a mode button, then you "press and hold" one D-PAD button at a time.
Depending on which mode button you clicked, the D-PAD buttons will do different things.
Overview of Movement Modes
The top three rows of mode buttons are marked "W", "D", and "F". These will be explained in this section. They are the main modes used for different competitions, or just to drive the hexapod around and make it do tricks. The fourth row, "R" will be explained under the section Record/Play.
The letters marking each row stand for:
- W: Walk. These are modes designed to get you from one place to another in different ways.
- D: Dance. These modes make the hexapod perform for you! They can be used just for fun, or for dance competitions. However, if you are clever you will find they can also be useful in other kinds of competition besides dance. For example, "ballet" dancing mode can sometimes be very useful during "Joust" games, since they allow you to stand up on tip-toes.
- F: Fight. These modes can be used effectively in many kinds of competitions. Some of them allow the front two legs to move in various ways, and some allow the entire hexapod to lean, tilt, and rotate in different ways.
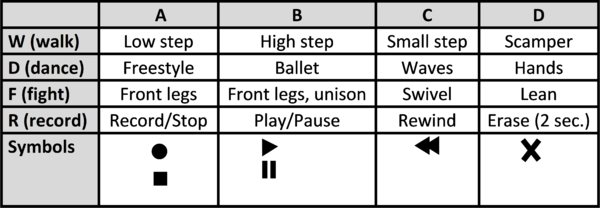
The diagram to the right is a grid that corresponds to the mode button layout, with words describing each mode. The following sections will give more details.
Walk Modes
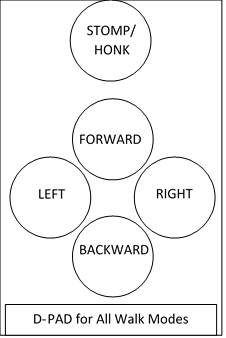
The four walk modes are accessed by selecting a mode from the "W" row. You'll be using these a lot, that's why they're on the top row. These are also easy to understand, because the D-PAD is used exactly the same way for all four, and are very intuitive. As you can see in the diagram to the right, the walk mode D-PAD "forward" button walks forward, "backward" walks backward, etc. What could be easier than that? The special D-Pad button does a "stomp" in place and also beeps the buzzer as if you're honking a horn.
The four walk modes are:
- W1: Low step. You can think of this as "normal" walking. It's a good general purpose walk. Because the legs are not lifted up very high, it's good for level ground without obstacles. Also, because the legs don't need much time to move up and down, it's pretty fast.
- W2: High step. This walk lifts the knees up high, and is useful for getting over obstacles. However, because it takes longer to move the knees farther, it is slower than low step mode.
- W3: Small step. This walk moves the hips very little, allowing you to move in tiny steps. This can be very useful if you want to slightly change your position, for example to adjust the hexapod for Capture the Flag or other competitions.
- W4: Scamper. In this walk, the legs move as quickly as possible. They move so quickly that you will have trouble moving in a controlled fashion. This is also a much less stable walk mode because one leg motion doesn't even finish before the next one starts! But if you need to get somewhere quickly and you're not too concerned about stability or accuracy, scamper mode is the right choice!
Dance Modes
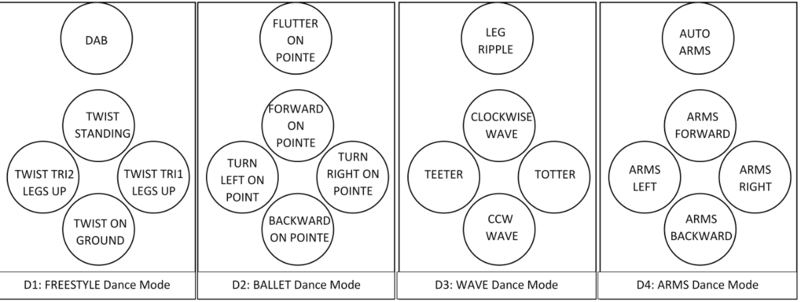
- D1: Freestyle. This dance mode allows several twisting motions: standing twist, sitting on the ground, some legs in the air, etc. The diagram to the right shows the names of each Freestyle dance mode.
- D2: Ballet. In ballet mode, the hexapod goes up on its tip-toes like a ballerina "on pointe". The D-PAD buttons have their usual walking mode meanings, forward, backward, left, right, and in-place. You won't move quickly in this mode, it's about grace and style, not speed!
- D3: Wave. The wave dance mode executes several different "waving" motions where the entire hexapod body sways back and forth, or in some cases ripples each leg in turn.
- D4: Hands. The hands dance modes leave four legs on the ground and use the other two legs as if they are arms coming off the sides. These "arms" can be made to sway back and forth or forward and backward by using the D-PAD.
Fight Modes
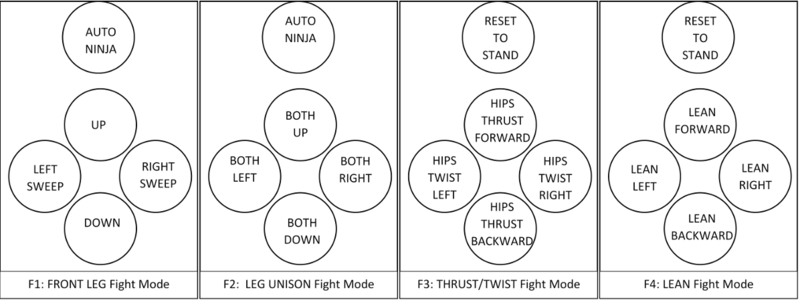
Each fight mode has a unique D-PAD configuration, but with a little practice you'll know them all. The diagram below shows how the D-PAD is used in each of the four fight modes.
- F1: Front Legs Fight. This mode puts the back four legs in a stable position and lifts the front two legs off the ground. D-PAD functions allow these front legs to execute sweeping and jabbing punch-like motions. The Auto Ninja mode executes a series of preprogrammed moves designed to dazzle the opponent. The special D-PAD button triggers "auto Ninja" mode in which a complex sequence of pre-programmed, rapid motions take place.
- F2: Front Leg Unison Fight. This mode is like Front Leg Fight Mode but both legs move together, allowing more power behind the punches. Like the F1 fight mode, the special D-PAD button executes an auto-Ninja function.
- F3: Swivel and Thrust. This mode uses the D-PAD functions to swivel the hips clockwise and counter-clockwise, or thrust the hexapod's body forward and backward using the hips. It can be very useful for Capture the Flag and Joust type competitions. The special D-PAD button returns the hexapod to a standing position.
- F4: Lean. In this mode, the entire body leans forward, backward, left or right. The special D-PAD button returns the hexapod to a standing position.
Record/Play
The bottom row of buttons, next to the R label, allow you to record, replay, and erase a set of motions. The gamepad also shows standard symbols for record/play functions (similar to DVR or DVD player controls). Recordings are stored on the SD card in the gamepad. If you do not have an SD card inserted, you cannot record and a low pitched error tone will come out of Vorpal if you try.
R1 (Record/Stop) has two functions. If you're not recording, it starts recording. If you are recording, it stops the recording. Similarly, R2 (Play/Pause) has two functions. If you are not playing a recording, this button causes the recording to start playing at the current position. If you are playing, this button causes the play to stop.
Recording a Session
To make a recording, follow these steps:
- Tap on R1 (Record/Stop).
- Use other buttons to do any set of motions you want.
- You will hear a very short chirping sound about every 4 seconds to remind you that you are recording.
- The recording can be quite long, depending on the size of your SD card, it could last for hours if desired! But usually you'll be recording short sequences that last only seconds or minutes.
NOTE: If you record a sequence, then record again without using rewind or erase first, the new sequence will be added to the end of the current recording. In this way you can build up a longer sequence of motions a few steps at a time.
- When you have recorded what you want, press R1 (Record/Stop) again.
Playing back a recording
To play back your current recording, follow these steps:
- Please R2 (Play/Pause)
- Your recording will replay from the beginning.
- There will be a short chirp at the end of the play to indicate is is completed.
- Pressing R2 while the recording is playing will pause the recording. Pressing it a third time will pick up where it left off. You may also press R3 (rewind) while paused to start over at the beginning.
Rewinding
To rewind the recording the start:
- Press R3 (Rewind).
- This is typically only useful if you paused a playback and want to start over from the beginning.
Erasing the recording
To erase the current recording:
- Press R4 (Erase) and hold it for four seconds.
- When you first press it, you will hear a brief squeal.
- After holding it for four seconds, you'll hear a longer squeal. This second, long squeal indicates the recording has been erased successfully.
Trouble shooting record/play mode
Recordings don't work at all
- Make sure you have an SD card properly inserted. After inserting, power off the gamepad and power it back on to make sure the SD is recognized by the system.
- If you have an SD card inserted but the record function still does not appear to work, it is possible your SD card is corrupted. You would need to insert it into a computer that has an SD card socket (or obtain a USB SD card reader, they are cheap) and use your computer to check the SD card for errors, or use your computer's FORMAT command to format the card. This will usually fix any errors.
My Robot is Driving Itself!
When you hand the gamepad over to someone who has never used it before, it's not uncommon for them to just start pressing buttons to see what they do. Invariably, someone will get into record mode by accident and record a long sequence. They may later stop the recording mode, then randomly hit the play button. They will then get really confused because it will seem like the robot has a mind of its own! It will just keep moving (playing the prior recording!) without the user pushing any buttons. If this happens, simply press R2 (Play/Pause) and then erase the accidental recording using R4 (hold for 4 seconds).
Trim Mode
The gamepad can also be used to make fine adjustments to the servo positions so they are perfectly aligned. This is important, as it ensures all the servos are equally bearing the weight of the robot, and makes the robot walk straighter and generally perform better.
This is a specialized function that you only need to do once after building the robot (or again after swapping a motor), so it is describe in a separate wiki page: Vorpal The Hexapod Trim Mode Guide.
Format SD Card
The gamepad can format the SD card that's in the SD card slot. This is useful because Arduino's SD library requires the card be formatted a certain way and most operating systems won't use the right method for small sized cards.
The SD card can sometimes become corrupted which will require it to be reformatted, or you may obtain a new SD card in the future and it's best to let the gamepad itself format it. If the SD card is missing or corrupted, attempting to record (R1) or play (R2) will result in a low pitch error buzz.
To avoid corrupting the SD card, follow these practices:
- Never remove or insert the SD card when the gamepad is turned on. Always turn the gamepad off before inserting or removing the SD card.
- Never shut off the gamepad when it is in record mode, as data may be partially saved to the SD card while recording, and sudden loss of power can corrupt the SD card. While recording, the robot will chirp once ever few seconds. To stop recording, press R2 (Play/Pause) or hold R4 (Delete) for several seconds until you hear a high pitch squeal.
Please note: formatting the SD card will erase all recordings, Scratch recordings, etc.
To format the SD card follow these steps:
- Turn the gamepad off.
- Hold down the DELETE key (R4). Keep holding it.
- Turn the gamepad on.
- Count to 10 slowly, then release the DELETE key.
- Reboot the gamepad (turn it off then back on).
Auto-Detect D-PAD Button Type
Manufacturers of the D-PAD modules that we use in our project have two different output formats for the data that comes out of the D-PAD module. Unfortunately there is no way to tell by looking at the module which kind of output it provides.
If you find that your gamepad is not properly controlling the robot (i.e. the D-PAD button presses are not executing the correct functions) then you may want to have the Gamepad auto-detect the exact kind of D-PAD you have. You only need to do this once, because the result of the auto-detect is save in nonvolatile memory (EEPROM). (Note: booting the gamepad with very weak batteries may cause the settings to be lost, requiring you to run this procedure again. Therefore, always start a session with fresh batteries).
To force the Gamepad to detect and save the D-PAD style, follow these steps:
- Turn the gamepad off.
- Hold down the top button of the D-PAD module (Special). Keep holding it.
- Turn the gamepad on.
- Count to 10 slowly, then release the D-PAD Special button.
The Gamepad's D-PAD should work properly after following this sequence. Again, you typically only need to do this once after building the Gamepad. You may need to do it again perhaps after swapping to a new D-PAD module if you repair the Gamepad, or if you boot the gamepad with very weak batteries sometimes the EEPROM settings get corrupted.
Vorpal The Hexapod Quick Links
| Sign Up For Our NEWSLETTER | VORPAL FORUM: Join the Discussion | |||
|
User Documentation: |
Getting & Giving Vorpal |
Activities: |
Contact/Press: |
|
